本文概述
- 为什么选择FOSUserBundle?
- 1.创建用户捆绑包(可选)
- 2.创建User.php和Group.php
- 3.更改默认用户提供程序
- 4.更新安全性配置
- 5.使用composer安装FOSUserBundle
- 6.启用默认路由
- 7.更新数据库架构
- 8, 测试你的用户系统
创建一个使用symfony 2或3的用户系统”不是”一项艰巨的任务。主页为你提供了有关如何在此处为应用程序创建自定义用户提供程序的快速介绍。
但是, 有什么可以比已经在许多Symfony开发人员中使用并已在Github中进行维护的东西更好呢?可能会创建自己的用户提供程序, 因为对于你的知识和你的自我, 这将是令人满意的!但是你会浪费宝贵的开发时间, 因为它可以在不到30分钟的时间内安装, 并且提供的功能与从一开始就需要创建的功能相同。
为什么选择FOSUserBundle?
FOSUserBundle在Symfony2中添加了对数据库支持的用户系统的支持。它为用户管理提供了一个灵活的框架, 旨在处理常见任务, 例如用户注册和密码检索。
功能包括:
- 可以通过Doctrine ORM, MongoDB / CouchDB ODM或Propel存储用户(在这种情况下, 我们将使用Doctrine)
- 注册支持, 每封电子邮件带有可选的确认
- 密码重置支持
本文将教你如何在项目中轻松设置FOSUserBundle(带有用户和组类), 并且你不会失败, 这是一个承诺。
1.创建用户捆绑包(可选)
使用Symfony中的php bin / console generate:bundle命令在symfony项目的/ src文件夹中创建一个新捆绑包。这样做的主要目的是将用户管理隔离在一个捆绑中。 bundle的结构不需要特殊, 只需要在内核中注册即可, 一切都会正常进行。
注意
如果你不想为用户系统创建额外的捆绑包, 只需按照现有捆绑包中的后续步骤进行操作即可。
2.创建User.php和Group.php
该捆绑软件的目的是将某些User类持久保存到数据库中。然后, 你的第一项工作是为你的应用程序创建User类。此类可以根据你的需要进行操作:添加任何其他有用的属性(用户表的字段)或方法。
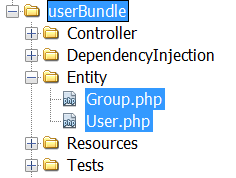
如果你决定创建一个额外的捆绑软件, 则其中可能没有Entity文件夹, 因此你需要创建一个名为Entity的新文件夹。在捆绑软件的Entity文件夹内, 创建2个文件User.php和Group.php。
User.php
User类内部应包含以下代码:
<?php
// src/Acme/UserBundle/Entity/User.php
// Change the namespace according to the path in your project
namespace userBundle\Entity;

// Using FOSUserBundle 1.3x the user class will locate instead in :
// use FOS\UserBundle\Entity\User as BaseUser;

use FOS\UserBundle\Model\User as BaseUser;
use Doctrine\ORM\Mapping as ORM;

/**
 * @ORM\Entity
 * @ORM\Table(name="fos_user")
 */
class User extends BaseUser
{
    /**
     * @ORM\Id
     * @ORM\Column(type="integer")
     * @ORM\GeneratedValue(strategy="AUTO")
     */
    protected $id;

    // Change the targetEntity path if you want to create the group

    /**
     * @ORM\ManyToMany(targetEntity="userBundle\Entity\Group")
     * @ORM\JoinTable(name="fos_user_user_group", *      joinColumns={@ORM\JoinColumn(name="user_id", referencedColumnName="id")}, *      inverseJoinColumns={@ORM\JoinColumn(name="group_id", referencedColumnName="id")}
     * )
     */
    protected $groups;

    public function __construct()
    {
        parent::__construct();
        // your own logic
    }
}
Group.php
Group类内部应包含以下代码:
<?php

// Change the namespace according to the path in your project
namespace userBundle\Entity;

use FOS\UserBundle\Model\Group as BaseGroup;
use Doctrine\ORM\Mapping as ORM;

/**
 * @ORM\Entity
 * @ORM\Table(name="fos_group")
 */
class Group extends BaseGroup
{
    /**
     * @ORM\Id
     * @ORM\Column(type="integer")
     * @ORM\GeneratedValue(strategy="AUTO")
     */
     protected $id;
}
最后, 你的捆绑包应类似于:

userBundle是直接在symfony项目的/ src文件夹中创建的, 因此类的名称空间是名称空间userBundle \ Entity;
3.更改默认用户提供程序
现在, 你的User类存在, 你需要在项目中启用FOSUserBundle类作为你的默认用户提供程序。你需要在项目的config.yml文件中添加配置, 它指定数据库的驱动程序, 用户和组类的路径, 如以下示例所示, 在config.yml文件中添加代码段并进行更改如果需要, 则指向类的路径:
# /app/config.yml
fos_user:
    db_driver: orm
    firewall_name: main
    user_class: userBundle\Entity\User
    group:
        group_class: userBundle\Entity\Group
现在, 你的课程将用作默认的用户提供程序。
4.更新安全性配置
你需要修改项目的security.yml文件并添加以下配置。注释此文件中的所有现有内容, 或将其删除并替换为:
# app/config/security.yml
security:
    encoders:
        FOS\UserBundle\Model\UserInterface: bcrypt

    role_hierarchy:
        ROLE_ADMIN:       ROLE_USER
        ROLE_SUPER_ADMIN: ROLE_ADMIN

    providers:
        fos_userbundle:
            id: fos_user.user_provider.username

    firewalls:
        main:
            pattern: ^/
            form_login:
                provider: fos_userbundle
                csrf_token_generator: security.csrf.token_manager
                # if you are using Symfony < 2.8, use the following config instead:
                # csrf_provider: form.csrf_provider

            logout:       true
            anonymous:    true

    access_control:
        - { path: ^/login$, role: IS_AUTHENTICATED_ANONYMOUSLY }
        - { path: ^/register, role: IS_AUTHENTICATED_ANONYMOUSLY }
        - { path: ^/resetting, role: IS_AUTHENTICATED_ANONYMOUSLY }
        - { path: ^/admin/, role: ROLE_ADMIN }
请记住(根据symfony项目的版本), 如果它在第一次不起作用时, 请更改防火墙中的csrf_token_generator属性。
5.使用composer安装FOSUserBundle
你可能会问自己, 为什么这不是第一步, 因为这是本文的重点?好吧, 答案很简单。在几乎所有教程中, 第一步都是使用composer安装FOSUserBundle, 但是在最新版本的Symfony中, 这将导致已知错误:
必须配置路径” fos_user”处的子节点” db_driver”。
该问题仅由执行安装步骤的顺序引起。要继续, 请使用Composer包括捆绑软件:
composer require friendsofsymfony/user-bundle "~2.0@dev"
或将行添加到你的composer.json行, 然后执行composer install:
"require":{
  "friendsofsymfony/user-bundle": "~2.0@dev"
}
但是, 完成FOSUserBundle的安装后, 你可能将面临最后一个例外:
[Symfony \ Component \ Config \ Exception \ FileLoaderLoadException]没有扩展能够加载fos_user的配置
你将看到此错误仅是因为我们尚未在AppKernel.php文件中启用捆绑软件, 因此你需要定位app / AppKernel.php文件并注册捆绑软件:
<?php
// app/AppKernel.php

public function registerBundles()
{
    $bundles = array(
        new FOS\UserBundle\FOSUserBundle(), );
}
6.启用默认路由
FOSUserBundle的结构已准备就绪, 但是你的应用程序中没有路由, 你无法使用该捆绑包, 因此我们需要将路由从FOSUserBundle导入到你的应用程序的路由。要通过在app / routing.yml文件中添加以下几行来启用默认路由(登录, 注册, 注销等):
# app/config/routing.yml
fos_user:
    resource: "@FOSUserBundle/Resources/config/routing/all.xml"

# IMPORTANT
# Import the following routes only if when you start the project
# those routes are not available :

fos_user_profile:
    resource: "@FOSUserBundle/Resources/config/routing/profile.xml"
    prefix: /profile

fos_user_register:
    resource: "@FOSUserBundle/Resources/config/routing/registration.xml"
    prefix: /register

fos_user_resetting:
    resource: "@FOSUserBundle/Resources/config/routing/resetting.xml"
    prefix: /resetting

fos_user_change_password:
    resource: "@FOSUserBundle/Resources/config/routing/change_password.xml"
    prefix: /profile
7.更新数据库架构
完成所有必需的基本配置后, 你只需要更新数据库即可创建表, 这些表将使用symfony命令插入用户:
对于Symfony 2.x, 控制台位于app目录中:
php app/console doctrine:schema:update --force对于Symfony 3.x, 控制台位于bin目录中:
php bin/console doctrine:schema:update --force注意
如果你遇到异常, 则必须配置路径” fos_user”处的子节点” from_email”, 请阅读本文以了解如何解决。
8, 测试你的用户系统
现在你需要测试一切是否正常, 请记住先清除缓存。在以下URL中注册第一个用户:
http://yourapp/app_dev.php/register
并登录:
http://yourapp/app_dev.php/login
玩得开心 !
 srcmini
评论前必须登录!
注册