本文概述
什么是reCAPTCHA
reCAPTCHA是一项免费服务, 可保护你的网站免受垃圾邮件和滥用的侵害。 reCAPTCHA使用高级风险分析引擎和自适应验证码, 以防止自动化软件参与你网站上的滥用行为。这样做是为了让你的有效用户轻松通过。
reCAPTCHA并不仅仅依靠文本变形来将人与机器区分开。相反, 它使用先进的风险分析技术, 考虑了用户与CAPTCHA的全部互动, 并评估了将人与机器人区分开来的各种线索。reCAPTCHA知道什么时候对人和机器人容易。轻松的验证码对于合法用户而言是轻而易举的事。
要求
要在你的网站上使用reCAPTCHA, 你需要:
- 在reCAPTCHA主页上注册你的网站
注册网站后, 你将被重定向到管理面板, 将拥有你拥有的所有网站。单击你要使用的那个。
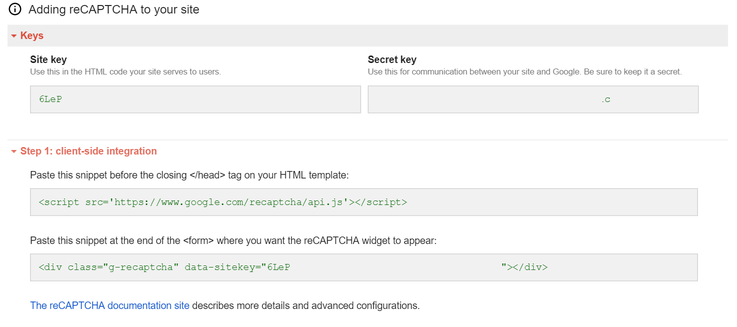
你会找到一个包含键的菜单, 客户端集成示例和服务器端集成示例。确保保存你的站点密钥和秘密密钥, 因为稍后我们将需要它们。

这应该足以处理客户端集成。
- 使用composer将google recaptcha php库包括到你的项目中。
要包括google recaptcha php库, 请将以下行添加到你的composer.json文件中(在require属性中):
"google/recaptcha": "~1.1"或者要求它直接在composer控制台中执行:
composer require google/recaptcha "~1.1"如果你不使用作曲家, 请在此处阅读如何使用require_once安装它。
这足以处理服务器端集成, 让我们开始吧!
实施中
对于此示例, 我们将使用普通的html表单, 你显然可以使用自制的symfony表单或crud生成的表单。只要确保在表单内添加新字段即可。
<!-- Important to add the recaptcha api in your document -->
<script src='https://www.google.com/recaptcha/api.js'></script>

<form method="post" action="path/to/action" id="contact-form">
  <input type="text" name="name" />
  <input type="subject" name="subject" />
  <textarea rows="5" name="message"></textarea>
  <!-- Now add the widget with the sitekey that you retrieve in the registration -->
  <div class="g-recaptcha" data-sitekey="mypublicdata-sitekey-ofthe-google-panel"></div>
  <button type="submit">Send message</button>
</form>

 {# or if you're using twig #}

{{form_start(form)}}
   {{form_widget(form.name)}}
   {{form_widget(form.subject)}}
   {{form_widget(form.message)}}
   <!-- Now add the widget with the sitekey that you retrieve in the registration -->
   <div class="g-recaptcha" data-sitekey="mypublicdata-sitekey-ofthe-google-panel"></div>

   {{form_widget(form.submit)}}
{{form_end(form)}}
不管你以何种方式呈现表单, 只要确保小部件都在表单内部即可。现在, 如果你的data-sitekey值正确并且与你的网站匹配, 则该小部件应该已经出现在你的表单中, 而没有任何问题。使用captcha api时, 此div将是表单内的一个form元素, 它将包含一个值, 我们将使用Submit事件中的php检索该值以对其进行验证。
现在, 你只需要在表单指向的控制器中处理Submit操作。
你的控制器现在应该看起来像:
use Symfony\Component\HttpFoundation\Request; // Handle the request in the controller
use ReCaptcha\ReCaptcha; // Include the recaptcha lib

public function mysubmitedAction(Request $request){
  $recaptcha = new ReCaptcha('here-is-the-secret-key-that-no-one-but-you-shouldKnow');
  $resp = $recaptcha->verify($request->request->get('g-recaptcha-response'), $request->getClientIp());

  if (!$resp->isSuccess()) {
    // Do something if the submit wasn't valid ! Use the message to show something
    $message = "The reCAPTCHA wasn't entered correctly. Go back and try it again." . "(reCAPTCHA said: " . $resp->error . ")";
  }else{
    // Everything works good ;) your contact has been saved.
  }
}
verify方法有3个参数, 你可以在此处阅读有关该方法的更多信息, 或查看官方资料库中的文档。
在Twig中使用宏渲染reCAPTCHA字段
通常, 对于symfony形式的自定义元素, 我们需要创建一个Custom FormType, 但是由于reCAPTCHA字段并不是真正的表单元素(select, checkbox或radio), 因此我们不能这样做。但是, 如果要使代码更易于维护, 可以在使用Twig的情况下创建宏。
在App / Resources / views / Macros中创建一个名称为form_elements.html.twig的新树枝文件, 内容如下(如果你决定更改路径, 请在此处阅读有关树枝中宏工作原理的更多信息):
{#app/Resources/views/Macros/form_elements.html.twig#}
{#
 # The recaptcha method allow you to render a reCAPTCHA element. It expects as first parameter the site key
 #}
{% macro recaptcha(siteKey)%}
    <script src='https://www.google.com/recaptcha/api.js'></script>
    <div class="g-recaptcha" data-sitekey="{{siteKey}}"></div>
{% endmacro %}
现在, 你可以在表单中简单地使用:而不是在每种表单上创建recaptcha的div和脚本标签, 你可以在其中使用:
{% import "Macros/form_elements.html.twig" as formElements %}

{{form_start(form)}}
   {{form_widget(form.name)}}
   {{form_widget(form.subject)}}
   {{form_widget(form.message)}}
   <!-- Now add the widget with the sitekey that you retrieve in the registration -->
   {{formElements.recaptcha("mypublicdata-sitekey-ofthe-google-panel")}}

   {{form_widget(form.submit)}}
{{form_end(form)}}
现在, 你的表格应该受到机器人的保护, 玩得开心!
 srcmini
评论前必须登录!
注册