本文概述
为了在Visual Studio中使用C#在WinForms中使用扫描仪, 我们将使用WIA API。 Windows图像采集(WIA)有时也称为Windows Imaging Architecture)是Microsoft Windows 2000及更高版本操作系统的Microsoft驱动程序模型和应用程序编程接口(API), 使图形软件能够与诸如扫描仪, 数码相机和Digital的成像硬件进行通信视频设备。
WIA使需要与成像硬件进行交互的应用程序开发人员, 设备制造商和扫描仪用户变得容易。该API集通过提供对以下方面的支持, 使成像应用程序具有静止图像采集硬件功能:
- 枚举可用的图像采集设备(Windows中已安装的扫描仪)。
- 同时创建到多个设备的连接。
- 以标准且可扩展的方式查询设备的属性。
- 通过使用标准和高性能传输机制来获取设备数据。
- 跨数据传输维护图像属性。
- 设备状态通知和扫描事件处理。
在本文中, 你将学习如何使用C#通过WIA操作图像扫描仪。
要求
- Visual Studio> = 2007(我们将使用Visual Studio社区)
- 已安装且功能正常的扫描仪
让我们开始吧 !
1.添加WIA参考
使用最新的.NET Framework版本(或旧的C#项目)创建一个新的WinForms项目。然后继续直接从Visual Studio引用Windows Image Acquisition COM组件。组件对象模型(COM)是独立于平台, 分布式, 面向对象的系统, 用于创建可以交互的二进制软件组件。 .NET组件可以调用COM组件并与之交互。
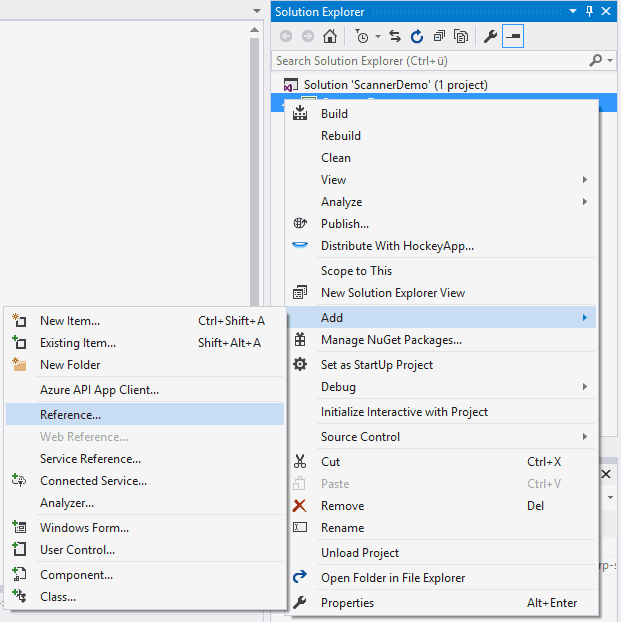
转到位于Visual Studio右上角的解决方案资源管理器, 并右键单击你的项目, 然后单击”添加”>”引用”。

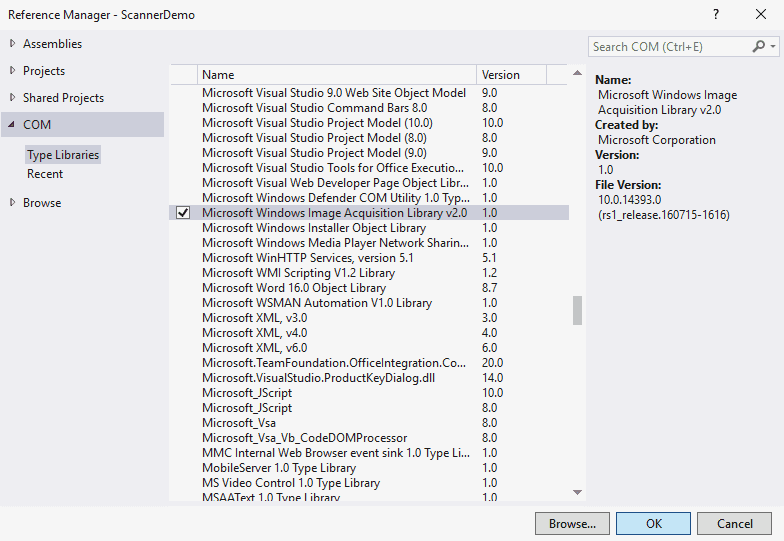
在紧急窗口中, 选择左侧菜单中的COM选项, 然后搜索Microsoft Windows Image Acquisition Library v2.0, 然后单击OK。

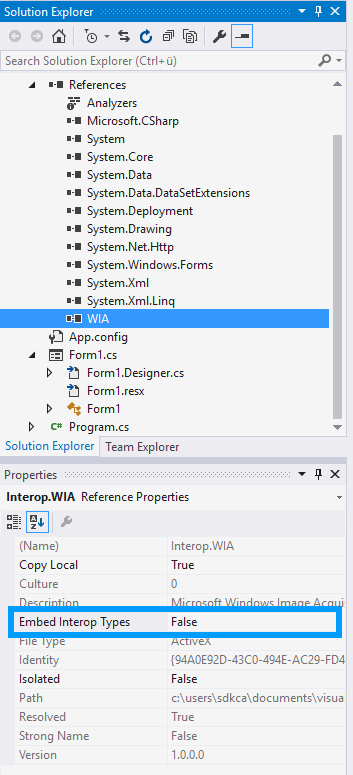
单击确定后, 引用将添加到你的项目中。现在, 你需要将WIA组件的Embed Interop Types属性设置为False。使用Visual Studio转到”解决方案资源管理器”并选择你的项目, 然后在项目中单击树视图组件中的”引用”并搜索WIA。选择WIA参考, 然后在”属性”面板中查找”嵌入互操作类型”选项, 并将此值设置为False:

现在, 你将可以在项目中使用WIA。
2.列出扫描仪设备
要列出设备, 你需要从WIA的DevicesManager对象中检索列表。第一步, 你需要在类顶部的代码中导入WIA组件:
using WIA;然后只需遍历设备管理器以列出设备:
// Create a DeviceManager instance
var deviceManager = new DeviceManager();

// Loop through the list of devices
for (int i = 1; i <= deviceManager.DeviceInfos.Count; i++)
{
    // Skip the device if it's not a scanner
    if (deviceManager.DeviceInfos[i].Type != WiaDeviceType.ScannerDeviceType)
    {
        continue;
    }

    // Print something like e.g "WIA Canoscan 4400F"
    Console.WriteLine(deviceManager.DeviceInfos[i].Properties["Name"].get_Value());
    // e.g Canoscan 4400F
    //Console.WriteLine(deviceManager.DeviceInfos[i].Properties["Description"].get_Value());
    // e.g \\.\Usbscan0
    //Console.WriteLine(deviceManager.DeviceInfos[i].Properties["Port"].get_Value());
}
Properties对象具有其他属性, 例如Id, Port, Manufacturer和Type, 请访问有关WIA设备信息类的MSDN页面以获取更多信息。
3.使用设备进行扫描
要保存扫描的图像, 你将需要导入以下类型:
using WIA;
using System.IO;
然后, 使用扫描仪的逻辑如下:
- 检索要使用的扫描仪的DeviceInfo实例。
- 使用DeviceInfo实例连接到扫描仪。
- 通过带有连接实例的items属性内具有索引1的元素选择扫描程序。
- 使用所选扫描仪的传输方法, 并提供扫描图像的输出格式作为第一个参数。
- 将返回的图像数据保存到文件中。
先前的逻辑通过以下代码实现。我们将选择系统上第一个可用的扫描仪, 并将遵循以前的算法:
注意
如果处理不当, 选择扫描仪, 然后使用其余代码启动扫描过程的过程可能会有些棘手。例如, 我们建议你向列表中添加一个列表框项, 并追加一个新项, 该项也显示名称和DeviceInfos对象(你将在本文结尾看到一个示例)。
 // Create a DeviceManager instance
var deviceManager = new DeviceManager();

// Create an empty variable to store the scanner instance
DeviceInfo firstScannerAvailable = null;

// Loop through the list of devices to choose the first available
for (int i = 1; i <= deviceManager.DeviceInfos.Count; i++)
{
    // Skip the device if it's not a scanner
    if (deviceManager.DeviceInfos[i].Type != WiaDeviceType.ScannerDeviceType)
    {
        continue;
    }

    firstScannerAvailable = deviceManager.DeviceInfos[i];

    break;
}

// Connect to the first available scanner
var device = firstScannerAvailable.Connect();

// Select the scanner
var scannerItem = device.Items[1];

// Retrieve a image in JPEG format and store it into a variable
var imageFile = (ImageFile)scannerItem.Transfer(FormatID.wiaFormatJPEG);

// Save the image in some path with filename
var path = @"C:\Users\<username>\Desktop\scan.jpeg";

if (File.Exists(path))
{
    File.Delete(path);
}

// Save image !
imageFile.SaveFile(path);
如果你对其进行测试, 则代码将起作用并且扫描仪将启动, 但是大多数扫描仪上的图像将不完整。这是因为我们没有设置扫描仪的任何常用属性, 你将在接下来的步骤中学习设置。
4.更改WIA属性
WIA有一些可修改的属性, 例如扫描宽度和高度, 颜色模式等。要设置此属性, 我们需要检索WIA.Properties类的属性, 然后设置新值。首先导入所需的类型:
using WIA;
using System.IO;
以下方法AdjustScannerSettings将通过帮助器函数SetWIAProperty设置一些基本属性, 以使其至少在大多数扫描设备中都起作用。请注意, 你需要在AdjustScannerSettings(通过连接实例的items属性内具有索引1的元素选择并分配给变量的扫描仪)方法中提供第一个参数作为扫描仪项目, 并在函数中记录其他参数。
重要
请记住, WIA具有许多可以修改的属性常数, 并且这些常数在不同的扫描设备上可能不可用(例如, 使用常数6147来修改水平分辨率), 请阅读以下MSDN页面以获取更多信息。
/// <summary>
/// Adjusts the settings of the scanner with the providen parameters.
/// </summary>
/// <param name="scannnerItem">Scanner Item</param>
/// <param name="scanResolutionDPI">Provide the DPI resolution that should be used e.g 150</param>
/// <param name="scanStartLeftPixel"></param>
/// <param name="scanStartTopPixel"></param>
/// <param name="scanWidthPixels"></param>
/// <param name="scanHeightPixels"></param>
/// <param name="brightnessPercents"></param>
/// <param name="contrastPercents">Modify the contrast percent</param>
/// <param name="colorMode">Set the color mode</param>
private static void AdjustScannerSettings(IItem scannnerItem, int scanResolutionDPI, int scanStartLeftPixel, int scanStartTopPixel, int scanWidthPixels, int scanHeightPixels, int brightnessPercents, int contrastPercents, int colorMode)
{
    const string WIA_SCAN_COLOR_MODE = "6146";
    const string WIA_HORIZONTAL_SCAN_RESOLUTION_DPI = "6147";
    const string WIA_VERTICAL_SCAN_RESOLUTION_DPI = "6148";
    const string WIA_HORIZONTAL_SCAN_START_PIXEL = "6149";
    const string WIA_VERTICAL_SCAN_START_PIXEL = "6150";
    const string WIA_HORIZONTAL_SCAN_SIZE_PIXELS = "6151";
    const string WIA_VERTICAL_SCAN_SIZE_PIXELS = "6152";
    const string WIA_SCAN_BRIGHTNESS_PERCENTS = "6154";
    const string WIA_SCAN_CONTRAST_PERCENTS = "6155";
    SetWIAProperty(scannnerItem.Properties, WIA_HORIZONTAL_SCAN_RESOLUTION_DPI, scanResolutionDPI);
    SetWIAProperty(scannnerItem.Properties, WIA_VERTICAL_SCAN_RESOLUTION_DPI, scanResolutionDPI);
    SetWIAProperty(scannnerItem.Properties, WIA_HORIZONTAL_SCAN_START_PIXEL, scanStartLeftPixel);
    SetWIAProperty(scannnerItem.Properties, WIA_VERTICAL_SCAN_START_PIXEL, scanStartTopPixel);
    SetWIAProperty(scannnerItem.Properties, WIA_HORIZONTAL_SCAN_SIZE_PIXELS, scanWidthPixels);
    SetWIAProperty(scannnerItem.Properties, WIA_VERTICAL_SCAN_SIZE_PIXELS, scanHeightPixels);
    SetWIAProperty(scannnerItem.Properties, WIA_SCAN_BRIGHTNESS_PERCENTS, brightnessPercents);
    SetWIAProperty(scannnerItem.Properties, WIA_SCAN_CONTRAST_PERCENTS, contrastPercents);
    SetWIAProperty(scannnerItem.Properties, WIA_SCAN_COLOR_MODE, colorMode);
}

/// <summary>
/// Modify a WIA property
/// </summary>
/// <param name="properties"></param>
/// <param name="propName"></param>
/// <param name="propValue"></param>
private static void SetWIAProperty(IProperties properties, object propName, object propValue)
{
    Property prop = properties.get_Item(ref propName);
    prop.set_Value(ref propValue);
}
值得再次说明, 这取决于你对属性的自定义, 但是我们为你提供了一种使用SetWIAProperty方法自定义属性的简单方法。
最后, 要正确开始扫描, 你只需要在初始化扫描器之前执行AdjustScannerSettings方法(混合步骤3和4):
// Create a DeviceManager instance
var deviceManager = new DeviceManager();

// Create an empty variable to store the scanner instance
DeviceInfo firstScannerAvailable = null;

// Loop through the list of devices to choose the first available
for (int i = 1; i <= deviceManager.DeviceInfos.Count; i++)
{
    // Skip the device if it's not a scanner
    if (deviceManager.DeviceInfos[i].Type != WiaDeviceType.ScannerDeviceType)
    {
        continue;
    }

    firstScannerAvailable = deviceManager.DeviceInfos[i];

    break;
}

// Connect to the first available scanner
var device = firstScannerAvailable.Connect();

// Select the scanner
var scannerItem = device.Items[1];

/**
 * Set the scanner settings
 */
int resolution = 150;
int width_pixel = 1250;
int height_pixel = 1700;
int color_mode = 1;
AdjustScannerSettings(scannerItem, resolution, 0, 0, width_pixel, height_pixel, 0, 0, color_mode);

// Retrieve a image in JPEG format and store it into a variable
var imageFile = (ImageFile)scannerItem.Transfer(FormatID.wiaFormatJPEG);

// Save the image in some path with filename
var path = @"C:\Users\<username>\Desktop\scan.jpeg";

if (File.Exists(path))
{
    File.Delete(path);
}

// Save image !
imageFile.SaveFile(path);
5.捕捉异常
WIA函数方法会引发可通过错误代码识别的异常。错误代码列表可以在MSDN网站上的WIA文档中找到。要处理WIA的错误, 请捕获COMException对象。切记之前要导入InteropServices类型:
using System.Runtime.InteropServices;然后将使用WIA的代码包装在try-catch语句中。你可以使用异常的ErrorCode属性来标识错误, 但请记住将其转换为其uint表示形式, 以便能够将其与MSDN中表的错误代码进行比较。
try
{
    // Some code that uses WIA
    // e.g
    //
    // var device = firstScannerAvailable.Connect();
    // var scannerItem = device.Items[1];
    // var imageFile = (ImageFile)scannerItem.Transfer(FormatID.wiaFormatJPEG);
}
catch (COMException e)
{
    // Convert the error code to UINT
    uint errorCode = (uint)e.ErrorCode;

    // See the error codes
    if (errorCode ==  0x80210006)
    {
        Console.WriteLine("The scanner is busy or isn't ready");
    }
    else if(errorCode == 0x80210064)
    {
        Console.WriteLine("The scanning process has been cancelled.");
    }
    else if(errorCode == 0x8021000C)
    {
        Console.WriteLine("There is an incorrect setting on the WIA device.");
    }
    else if(errorCode == 0x80210005)
    {
        Console.WriteLine("The device is offline. Make sure the device is powered on and connected to the PC.");
    }
    else if(errorCode == 0x80210001)
    {
        Console.WriteLine("An unknown error has occurred with the WIA device.");
    }
}
6.显示扫描进度
要显示扫描仪的进度, 可以使用CommonDialogClass的ShowTransfer方法。 CommonDialog控件是一个运行时不可见的控件, 可以在调用CreateObject时使用” WIA.CommonDialog”作为ProgID来创建, 也可以通过将CommonDialog对象放在窗体上来创建。你可以通过将扫描结果(从ShowTransfer方法返回的对象)转换为ImageFile类型来检索图像。

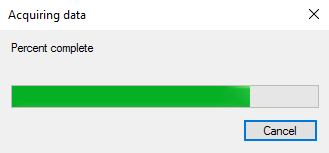
此方法将显示一个带有进度条的微型对话框, 该进度条指示并在扫描过程中进行更新。它希望将扫描仪项目作为第一个参数, 将扫描图像的格式作为第二个参数, 并将指示是否应显示”取消扫描”按钮的布尔值作为第三个参数。如果用户取消了扫描过程, 请注意添加try-catch语句以防止你的应用程序崩溃。在班级顶部导入以下类型:
using WIA;
using System.Runtime.InteropServices;
然后选择扫描仪并开始扫描过程
// Create a DeviceManager instance
var deviceManager = new DeviceManager();

// Create an empty variable to store the scanner instance
DeviceInfo firstScannerAvailable = null;

// Loop through the list of devices to choose the first available
for (int i = 1; i <= deviceManager.DeviceInfos.Count; i++)
{
    // Skip the device if it's not a scanner
    if (deviceManager.DeviceInfos[i].Type != WiaDeviceType.ScannerDeviceType)
    {
        continue;
    }

    firstScannerAvailable = deviceManager.DeviceInfos[i];

    break;
}

// Connect to the first available scanner
var device = firstScannerAvailable.Connect();

// Select the scanner
var scannerItem = device.Items[1];

CommonDialogClass dlg = new CommonDialogClass();

try
{
    object scanResult = dlg.ShowTransfer(scannerItem, WIA.FormatID.wiaFormatPNG, true);

    if (scanResult != null){
        ImageFile image = (ImageFile)scanResult;

        // Do the rest of things as save the image
    }
}
catch (COMException e)
{
    // Display the exception in the console.
    Console.WriteLine(e.ToString());

    uint errorCode = (uint)e.ErrorCode;

    // Catch 2 of the most common exceptions
    if (errorCode ==  0x80210006)
    {
        Console.WriteLine("The scanner is busy or isn't ready");
    }else if(errorCode == 0x80210064)
    {
        Console.WriteLine("The scanning process has been cancelled.");
    }
}
通过所有这些基本说明, 你将能够使用C#在WinForms中创建自己的扫描应用程序。
实施实例
我们刚刚编写了一个示例应用程序, 该应用程序在列表框中列出了所有可用的扫描仪设备, 并允许你扫描文件并将其保存在自定义路径中。它实现了扫描进度对话框, 并允许你将图像保存为PNG, JPEG或TIFF的不同格式:
只需克隆存储库, 使用Visual Studio打开项目并进行测试。可以在此Github存储库中找到源代码。
编码愉快!
 srcmini
评论前必须登录!
注册