本文概述
几年前, 由于计算机使用C#声卡, 所以录制当前正在扬声器中播放的音频确实很棘手。幸运的是, 随着时间的推移, Windows Vista中引入了一个有用的API。 Windows音频会话API(WASAPI)是Microsoft与音频设备对话的最现代方法。在Windows Vista, Windows 7和更高版本的Windows中可用。它允许将未修改的比特流传送到声音设备, 并提供与ASIO驱动程序相似的好处。 NAudio围绕此API提供了一个非常有用的包装, 使你可以使用C#轻松记录声卡中的音频。
在本文中, 我们将向你展示如何在WinForms中使用带有C#的NAudio记录来自声卡的音频。
1.使用NuGet安装NAudio
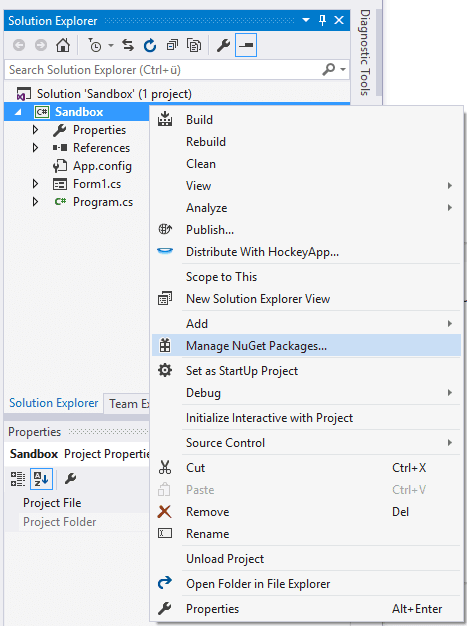
你将需要使用NuGet程序包管理器在项目中安装NAudio库。打开你的Winforms C#项目, 然后在解决方案资源管理器中打开NuGet程序包管理器:

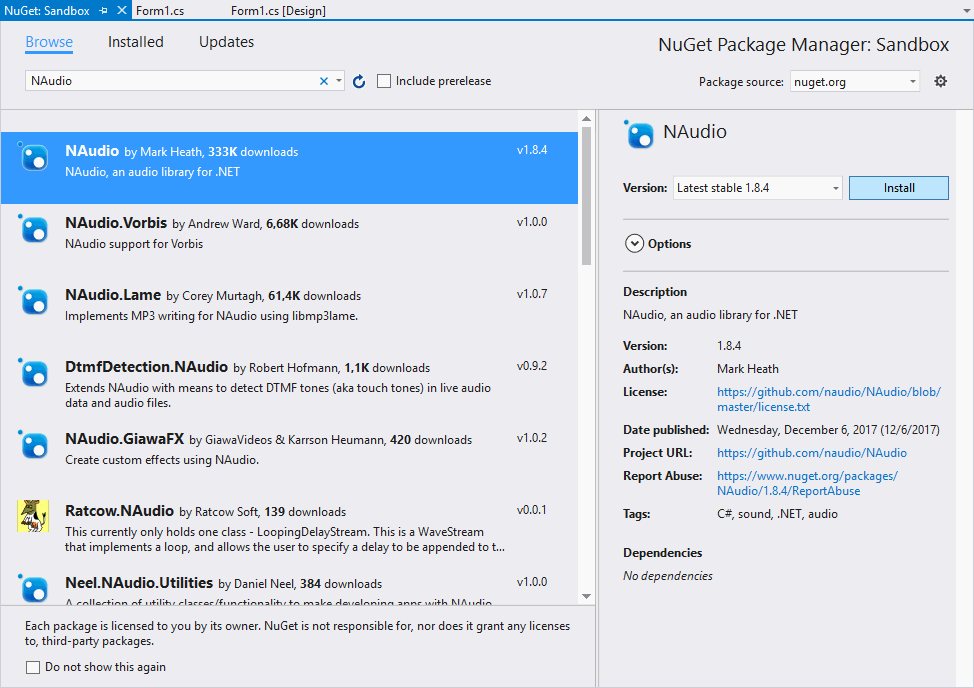
转到浏览选项卡并搜索NAudio:

从列表中, 选择Mark Heath提供的NAudio软件包, 然后单击”安装”按钮即可进行安装。安装完成后, 你将可以在要使用它的类中导入NAudio的Wave命名空间, 如下所示:
using NAudio.Wave;如果你已经安装了NAudio, 则可以继续下一步。
2.了解录音的逻辑
借助NAudio, 幸运的是, 以几乎每个开发人员都可以理解和使用的方式抽象和编写了记录从扬声器(声卡)发出的音频的复杂过程背后的大多数硬逻辑。 WasapiLoopbackCapture是NAudio的类, 你将使用它来记录它, 该类是WASAPI(Windows音频会话API)写得很好的包装, 可以与NAudio的某些文件编写器类一起使用, 以轻松地记录来自系统的默认声音源。
录制音频所需的逻辑是最小的, 最初, 你需要创建WaveFileWriter和WasapiLoopBackCapture类的实例。l WaveFileWriter希望将wav文件的写入路径(第一个作为第一个参数)以及来自扬声器/声卡的录制音频)以及捕获器实例的WaveFormat属性作为第二个参数。这样做之后, 你就可以编写声卡发出的声音了, 但是由于需要将侦听器附加到捕获器实例(即DataAvailable), 因此并不能自动完成。当接收到一些音频时触发此事件, 在此回调中, 你需要使用音频写入器, 将其作为写入方法的第一个参数, 缓冲区以及记录字节的最短部分和记录字节本身提供。一旦捕获器停止, 你还需要处置音频写入器, 以便可以访问文件。最后, 你可以简单地使用StartRecording方法启动记录器。
值得一提的是代码是异步的, 因此你基本上不需要关心线程或其他复杂的东西(也许最初是这样):
// Define the output wav file of the recorded audio
string outputFilePath = @"C:\Users\sdkca\Desktop\system_recorded_audio.wav";

// Redefine the capturer instance with a new instance of the LoopbackCapture class
WasapiLoopbackCapture CaptureInstance = new WasapiLoopbackCapture();

// Redefine the audio writer instance with the given configuration
WaveFileWriter RecordedAudioWriter = new WaveFileWriter(outputFilePath, CaptureInstance.WaveFormat);

// When the capturer receives audio, start writing the buffer into the mentioned file
CaptureInstance.DataAvailable += (s, a) =>
{
    // Write buffer into the file of the writer instance
    RecordedAudioWriter.Write(a.Buffer, 0, a.BytesRecorded);
};

// When the Capturer Stops, dispose instances of the capturer and writer
CaptureInstance.RecordingStopped += (s, a) =>
{
    RecordedAudioWriter.Dispose();
    RecordedAudioWriter = null;
    CaptureInstance.Dispose();
};

// Start audio recording !
CaptureInstance.StartRecording();
要停止音频录制, 你只需运行捕获器的StopRecording方法:
CaptureInstance.StopRecording();写入所需文件的缓冲区将停止, 并在执行过程中生成一个wav文件, 其中包含系统中产生的音频。显然, 测试时不要忘记播放一些音频, 否则你将听不到任何声音!
完整的例子
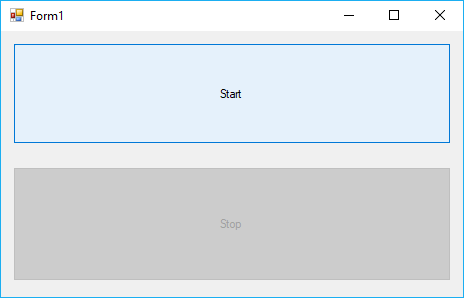
在此示例中, 我们将简单地创建一个包含2个按钮的表单, 一个按钮启动记录器(button1), 另一个按钮停止记录器(button2)。停止按钮最初是禁用的, 一旦刻录机启动, 它将启用, 反之亦然。图形形式如下:

我们将实现的逻辑非常简单, 但功能强大。当用户单击开始时, 将记录系统的音频;当用户单击停止时, 记录器将停止并完成我们所需的输出音频文件的写入缓冲区。 WaveFileWriter和WasapiLoopbackCapture的实例在类级别上是可访问的, 因此我们的”开始”和”停止”按钮可以访问它们, 因为此行为最初设置为null。
接下来, 将点击侦听器附加到两个按钮上并分别分配逻辑。对于”开始”按钮, 定义一个变量, 其中包含输出音频文件的路径, 并用新的实例重新定义WaveFileWriter和WasapiLoopbackCapture实例。然后, 将onDataAvailable和onRecordingStopped回调附加到捕获器实例并分别写入逻辑, 在这种情况下, 当数据可用时, 将输出缓冲区写入到波形编写器使用的声明文件中。当记录停止时, 显然应该处置捕获实例。最后, 当用户单击”停止”按钮时, 记录器实例应仅停止记录器, 同时禁用”停止”按钮并再次启用”开始”按钮, 以便可以再次记录新文件:
using System;
using System.Windows.Forms;

// Import Wave of NAudio
using NAudio.Wave;

namespace Sandbox
{
    public partial class Form1 : Form
    {
        // Create class-level accessible variables to store the audio recorder and capturer instance
        private WaveFileWriter RecordedAudioWriter = null;
        private WasapiLoopbackCapture CaptureInstance = null;

        public Form1()
        {
            InitializeComponent();
        }

        private void button1_Click(object sender, EventArgs e)
        {
            // Define the output wav file of the recorded audio
            string outputFilePath = @"C:\Users\sdkca\Desktop\system_recorded_audio.wav";

            // Redefine the capturer instance with a new instance of the LoopbackCapture class
            this.CaptureInstance = new WasapiLoopbackCapture();

            // Redefine the audio writer instance with the given configuration
            this.RecordedAudioWriter = new WaveFileWriter(outputFilePath, CaptureInstance.WaveFormat);

            // When the capturer receives audio, start writing the buffer into the mentioned file
            this.CaptureInstance.DataAvailable += (s, a) =>
            {
                this.RecordedAudioWriter.Write(a.Buffer, 0, a.BytesRecorded);
            };

            // When the Capturer Stops
            this.CaptureInstance.RecordingStopped += (s, a) =>
            {
                this.RecordedAudioWriter.Dispose();
                this.RecordedAudioWriter = null;
                CaptureInstance.Dispose();
            };

            // Enable "Stop button" and disable "Start Button"
            this.button1.Enabled = false;
            this.button2.Enabled = true;

            // Start recording !
            this.CaptureInstance.StartRecording();
        }

        private void button2_Click(object sender, EventArgs e)
        {
            // Stop recording !
            this.CaptureInstance.StopRecording();

            // Enable "Start button" and disable "Stop Button"
            this.button1.Enabled = true;
            this.button2.Enabled = false;
        }
    }
}
编码愉快!
 srcmini
评论前必须登录!
注册