本文概述
2016年6月23日更新:Electron的Google语音识别已被禁用, 因此该功能不再可用。在此处阅读有关该问题的更多信息。
Electron Framework使用嵌入式铬框架, 因此在Electron App中可以使用Google Chrome上的大多数(不是全部)功能。
在本文中, 你将学习如何使用Artyom.js添加语音命令和合成文本。 Artyom.js是语音识别和语音合成的有用包装, 可通过几行代码轻松添加语音命令和语音文本。
包含artyom.js
在node.js命令行中执行以下命令, 将artyom添加到你的项目中:
npm install artyom.js --save建议在此处阅读artyom的文档或在此处访问官方资料库。
使用html文档头中的脚本标签将artyom.js文件包括在你的项目中。
<script src="path-to-file/artyom.min.js"></script>语音合成
可惜的是, 使用Electron Framework, 你将无法选择所需的声音, 而是将选择计算机的默认声音。这意味着, 你只能使用默认语言, 也就是说, 如果你的计算机是西班牙文, 则只能读取西班牙文。除非要编写自己的语音合成模块, 否则请阅读语音合成API的文档并学习如何选择语音, 否则语音将变得无用, 因为它可能仅适用于你正在工作的计算机(不可维护)。
要合成文本, 请使用artyom.say函数:
artyom.say("I will read this text on your computer, great isn't?");注意:Artyom在Google Chrome中解决了200个字符的限制, 但是在Electron App中, 此限制不存在, 因为未使用任何远程服务。语音合成使用OS本地语音。
语音指令
要将语音命令添加到我们的Electron App, 我们将使用artyom.addCommands函数。每个命令都是一个文字对象, 带有在数组中触发命令的单词和一个动作参数, 当语音与命令匹配时, 该动作参数将被触发。
如果用户说” hello”或” hi”, 则以下命令回答” hello”:
var adminName = "Carlos";

artyom.addCommands({
    indexes: ["Hello", "Hi"], action: function(){
        artyom.say("Hello, how are you today "+ adminName +"?");
    }
});
现在你知道如何添加命令, 让我们从一个基本示例开始。
例子
添加3个按钮, 并在onclick事件上将以下每个功能附加到它们。
一个将在连续模式下启动artyom, 另一个将在一个命令侦听器中启动。
注意:在Google Chrome浏览器中, 需要https连接才能使用连续模式, 但是在Electron App中, 它可以正常工作。
<button type="button" onclick="StartArtyomOneCommand();">Start artyom one command</button>
<button type="button" onclick="StartArtyomContinuous();">Start artyom continuous assistant</button>
<br>
<button type="button" onclick="StopArtyom();">Stop recognition</button>

<script>
function StartArtyomOneCommand(){
    console.log("One command");
    if(artyom.isRecognizing()){
        return alert("Stop artyom first !");
    }

    //Although the voice can't be changed, // You need to set the language for the speech
    // Recognition, see the documentation for more examples
    return artyom.initialize({
        lang:"en-GB", debug:true, continuous:false, listen:true
    });
}

function StartArtyomContinuous(){
    console.log("Continuous commands");
    if(artyom.isRecognizing()){
        return alert("Stop artyom first !");
    }

    // You can create a permanent voice assistant
    // if you want using the continuous mode !
    return artyom.initialize({
        lang:"en-GB", debug:true, continuous:false, listen:true
    });
}

function StopArtyom(){
    artyom.fatality();
}
</script>
现在添加一些命令, 并在window.onload事件上添加artyom的错误侦听器:
<script>
'use strict';
    window.onload = function(){

        // Add the error listeners
        artyom.when("ERROR", function(err){
            console.error("An error ocurred : ", err.code);
        });

        console.log("Artyom is ready");

        // Important, add the commands to process.
        artyom.addCommands([
            {
                indexes:["Hello", "Hi"], action: function(i){
                    artyom.say("Hello, how are you today?");
                }
            }, {
                indexes:["Say * please"], smart:true, action: function(i, wildcard, sentence){
                    artyom.say(wildcard);
                }
            }, {
                indexes:["Text content *"], smart:true, action: function(i, wildcard, sentence){
                    document.getElementById("text-content").value = wildcard;
                }
            }, {
                indexes:["write * in the console"], smart:true, action: function(i, wildcard, sentence){
                    console.log(wildcard);
                }
            }
        ]);
    };
</script>
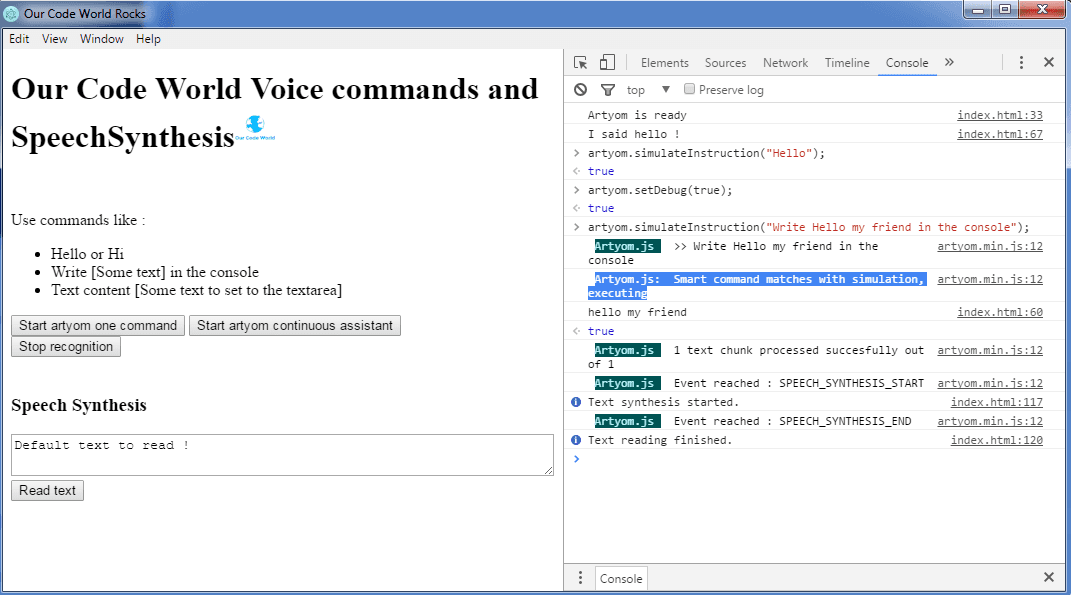
最后, 只需使用npm start构建你的应用程序并测试我们刚刚添加的命令。语音合成不需要演示, 因为你只需要将字符串作为第一个参数传递给artyom.say函数即可。

你可以在此处的存储库中的官方代码世界电子示例中查看先前的示例。
 srcmini
评论前必须登录!
注册