OpenCV是一个库, 用于使用python等编程语言进行图像处理。该项目利用OpenCV库将网络摄像头作为主要摄像头进行实时面部检测。
以下是它的要求:
- Python 2.7
- OpenCV
- Numpy
- Haar级联正面人脸分类器
使用的方法/算法:
- 该项目使用LBPH(局部二进制图案直方图)算法来检测人脸。它通过对每个像素的邻域设定阈值来标记图像的像素, 并将结果视为二进制数。
- LBPH使用4个参数:
(i)半径:半径用于构建圆形局部二进制图案, 并表示半径
中心像素。
(ii)邻居:构建圆形局部二进制模式的采样点数。
(iii)网格X:水平方向的像元数。
(iv)网格Y:垂直方向的像元数。 - 用带有标签的面部训练构建的模型, 然后为机器提供测试数据, 然后机器为其确定正确的标签。
如何使用 :
- 在你的电脑中创建一个目录并命名(例如项目)
- 创建两个名为create_data.py和face_recognize.py的python文件, 分别复制其中的第一个源代码和第二个源代码。
- 将haarcascade_frontalface_default.xml复制到项目目录, 你可以在opencv或从
这里. - 你现在准备运行以下代码。
# Creating database
# It captures images and stores them in datasets
# folder under the folder name of sub_data
import cv2, sys, numpy, os
haar_file = 'haarcascade_frontalface_default.xml'

# All the faces data will be
#  present this folder
datasets = 'datasets'


# These are sub data sets of folder, # for my faces I've used my name you can
# change the label here
sub_data = 'vivek'

path = os.path.join(datasets, sub_data)
if not os.path.isdir(path):
     os.mkdir(path)

# defining the size of images
(width, height) = ( 130 , 100 )

#'0' is used for my webcam, # if you've any other camera
#  attached use '1' like this
face_cascade = cv2.CascadeClassifier(haar_file)
webcam = cv2.VideoCapture( 0 )

# The program loops until it has 30 images of the face.
count = 1
while count < 30 :
     (_, im) = webcam.read()
     gray = cv2.cvtColor(im, cv2.COLOR_BGR2GRAY)
     faces = face_cascade.detectMultiScale(gray, 1.3 , 4 )
     for (x, y, w, h) in faces:
         cv2.rectangle(im, (x, y), (x + w, y + h), ( 255 , 0 , 0 ), 2 )
         face = gray[y:y + h, x:x + w]
         face_resize = cv2.resize(face, (width, height))
         cv2.imwrite( '% s/% s.png' % (path, count), face_resize)
     count + = 1

     cv2.imshow( 'OpenCV' , im)
     key = cv2.waitKey( 10 )
     if key = = 27 :
         break
在对脸部模型进行训练之后, 应运行以下代码:
# It helps in identifying the faces
import cv2, sys, numpy, os
size = 4
haar_file = 'haarcascade_frontalface_default.xml'
datasets = 'datasets'

# Part 1: Create fisherRecognizer
print ( 'Recognizing Face Please Be in sufficient Lights...' )

# Create a list of images and a list of corresponding names
(images, lables, names, id ) = ([], [], {}, 0 )
for (subdirs, dirs, files) in os.walk(datasets):
     for subdir in dirs:
         names[ id ] = subdir
         subjectpath = os.path.join(datasets, subdir)
         for filename in os.listdir(subjectpath):
             path = subjectpath + '/' + filename
             lable = id
             images.append(cv2.imread(path, 0 ))
             lables.append( int (lable))
         id + = 1
(width, height) = ( 130 , 100 )

# Create a Numpy array from the two lists above
(images, lables) = [numpy.array(lis) for lis in [images, lables]]

# OpenCV trains a model from the images
# NOTE FOR OpenCV2: remove '.face'
model = cv2.face.LBPHFaceRecognizer_create()
model.train(images, lables)

# Part 2: Use fisherRecognizer on camera stream
face_cascade = cv2.CascadeClassifier(haar_file)
webcam = cv2.VideoCapture( 0 )
while True :
     (_, im) = webcam.read()
     gray = cv2.cvtColor(im, cv2.COLOR_BGR2GRAY)
     faces = face_cascade.detectMultiScale(gray, 1.3 , 5 )
     for (x, y, w, h) in faces:
         cv2.rectangle(im, (x, y), (x + w, y + h), ( 255 , 0 , 0 ), 2 )
         face = gray[y:y + h, x:x + w]
         face_resize = cv2.resize(face, (width, height))
         # Try to recognize the face
         prediction = model.predict(face_resize)
         cv2.rectangle(im, (x, y), (x + w, y + h), ( 0 , 255 , 0 ), 3 )

         if prediction[ 1 ]< 500 :

            cv2.putText(im, '% s - %.0f' %
(names[prediction[ 0 ]], prediction[ 1 ]), (x - 10 , y - 10 ), cv2.FONT_HERSHEY_PLAIN, 1 , ( 0 , 255 , 0 ))
         else :
           cv2.putText(im, 'not recognized' , (x - 10 , y - 10 ), cv2.FONT_HERSHEY_PLAIN, 1 , ( 0 , 255 , 0 ))

     cv2.imshow( 'OpenCV' , im)

     key = cv2.waitKey( 10 )
     if key = = 27 :
         break
注意 :以上程序无法在在线IDE上运行。
程序截图
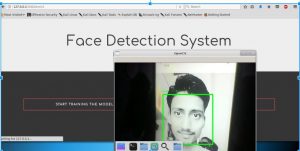
可能看起来有些不同, 因为我已将上述程序集成在flask框架上
运行第二个程序产生的结果类似于下图:

人脸检测
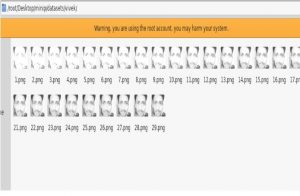
数据集存储:

数据集
首先, 你的面试准备可通过以下方式增强你的数据结构概念:Python DS课程。
 srcmini
评论前必须登录!
注册