Kivy是Python中与平台无关的GUI工具。由于它可以在Android, IOS, Linux和Windows等操作系统上运行。它基本上是用于开发Android应用程序, 但这并不意味着它不能在桌面应用程序上使用。
??Kivy教程–通过示例学习Kivy。
滑杆:
要使用滑块, 首先必须导入包含滑块的所有功能的模块, 即
Module: kivy.uix.slider创建Slider时要遵循的基本方法–
1) import kivy
2) import kivyApp
3) import BoxLayout
4) set minimum version(optional)
5) Extend the class
6) set up .kv file (name same as the Slider.kv)
7) Run an instance of the class
以下是带有.kv文件的代码实现滑块的代码:
# main.py file of slider

# base Class of your App inherits from the App class.
# app:always refers to the instance of your application
from kivy.app import App

# BoxLayout arranges children in a vertical or horizontal box.
# or help to put the children at the desired location.
from kivy.uix.boxlayout import BoxLayout


# creating the root widget used in .kv file
class SliderWidget(BoxLayout):
     pass

# class in which name .kv file must be named Slider.kv.
# or creating the App class
class Slider(App):
     def build( self ):
         # returning the instance of SliderWidget class
         return SliderWidget()

# run the app
if __name__ = = '__main__' :
     Slider().run()
现在.kv文件:
Slider.kv
文件
<SliderWidget>:

     # creating the Slider
     Slider:

         # giving the orientation of Slider
         orientation: "vertical"
         min : 0  # minimum value of Slider
         max : 100 # maximum value of Slider
         value: 0  # initial value of Slider

         # when slider moves then to increase value
         on_value:label1.text = str ( int ( self .value))

     # Adding label
     Label:
         id : label1
         font_size: "30sp"
         text: "0"
         color: 1 , 0 , 0 , 1

     Slider:
         orientation: "horizontal"
         min : 0
         max : 100
         value: 30
         on_value:label2.text = str ( int ( self .value))


     Label:
         id : label2
         font_size: "30sp"
         text: "30"
         color: 0 , 0 , 1 , 1
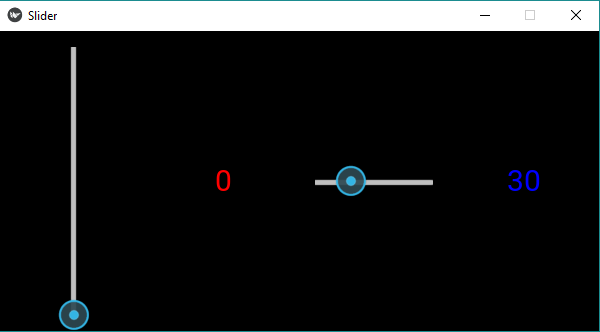
输出如下:

对于没有.kv文件的滑块, 请参考– Python | Kivy中的滑块小部件
首先, 你的面试准备可通过以下方式增强你的数据结构概念:Python DS课程。
 srcmini
评论前必须登录!
注册