Kivy是Python中与平台无关的GUI工具。由于它可以在Android, IOS, Linux和Windows等操作系统上运行。它基本上是用于开发Android应用程序, 但这并不意味着它不能在桌面应用程序上使用。
??Kivy教程–通过示例学习Kivy。
进度栏小部件:
ProgressBar小部件用于可视化某些任务的进度。当前仅支持水平模式:垂直模式尚不可用。进度栏没有交互元素, 并且是仅用于显示的窗口小部件。
要使用Progressbar小部件, 你必须通过以下命令将其导入:从kivy.uix.progressbar import ProgressBar
进度条采用两个参数:
1)max:允许的最大值。它是一个数值属性, 默认为100。
2)value:滑块的当前值
Basic Approach:

1) import kivy
2) import kivyApp
3) import progressbar
4) import Boxlayout(according to need)
5) Set minimum version(optional)
6) Create Layout class:
7) Create App class
8) Create .kv file:
         1) Add progress bar
         2) Add label
         3) Add canvas if you want as i did
8) return Layout/widget/Class(according to requirement)
9) Run an instance of the class
该方法的实施:
.py文件
# Program to Show how to create a Progressbar in .kv file

# import kivy module
import kivy

# base Class of your App inherits from the App class.
# app:always refers to the instance of your application
from kivy.app import App

# this restrict the kivy version i.e
# below this kivy version you cannot
# use the app or software
kivy.require( '1.9.0' )

# The Label widget is for rendering text.
from kivy.uix.label import Label

# The ProgressBar widget is used to
# visualize the progress of some task
from kivy.uix.progressbar import ProgressBar

# BoxLayout arranges children in a vertical or horizontal box.
# or help to put the children at the desired location.
from kivy.uix.boxlayout import BoxLayout


# The class whose internal work is in  kv file
class ProgBar(BoxLayout):
     pass

# Create the App Class
class mainApp(App):
     def build( self ):
         return ProgBar()

# Create the run
if __name__ = = '__main__' :
     mainApp().run()
.kv文件
# .kv file

# Extension of ProgBar class in .kv file
<ProgBar>:

     orientation: 'vertical'
     # Creating the background of the App
     canvas:
         Color:
             rgb: . 45 , . 28 , . 5
         Rectangle:
             pos: self .pos
             size: self .size

     # Providing label to the pg bar
     Label:
         text: '[size = 40px]Progress Bar 1 (at .25)'
         color: . 5 , 0 , . 5 , 1
         markup: True

     # Creating thepg bar of specific value
     ProgressBar:
         value: . 25
         min : 0
         max : 1
         pos_hint: { 'x' :. 1 }
         size_hint_x: . 8

     # Providing label to the pg bar
     Label:
         text: '[size = 40px]Progress Bar 2 (at .55)'
         color: . 5 , 0 , . 5 , 1
         markup: True

     # Creating thepg bar of specific value
     ProgressBar:
         value: . 55
         min : 0
         max : 1
         pos_hint: { 'x' :. 1 }
         size_hint_x: . 8
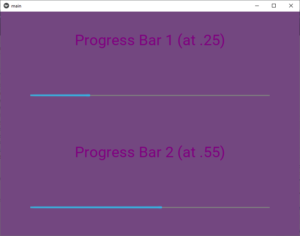
输出如下:

首先, 你的面试准备可通过以下方式增强你的数据结构概念:Python DS课程。
 srcmini
评论前必须登录!
注册